Layout Management
Role Required: SOCIETY_ADMIN
Navigation: Sidebar → Layouts → Manage Layouts
Last Updated: March 2026 | Portal Version: 1.0
Overview
A layout represents a housing development project — a piece of land divided into individual plots for sale to society members. As a Society Admin, you create layouts, configure their details, upload map images, assign amenities, and manage their lifecycle from draft to active, and eventually to inactive or archived.
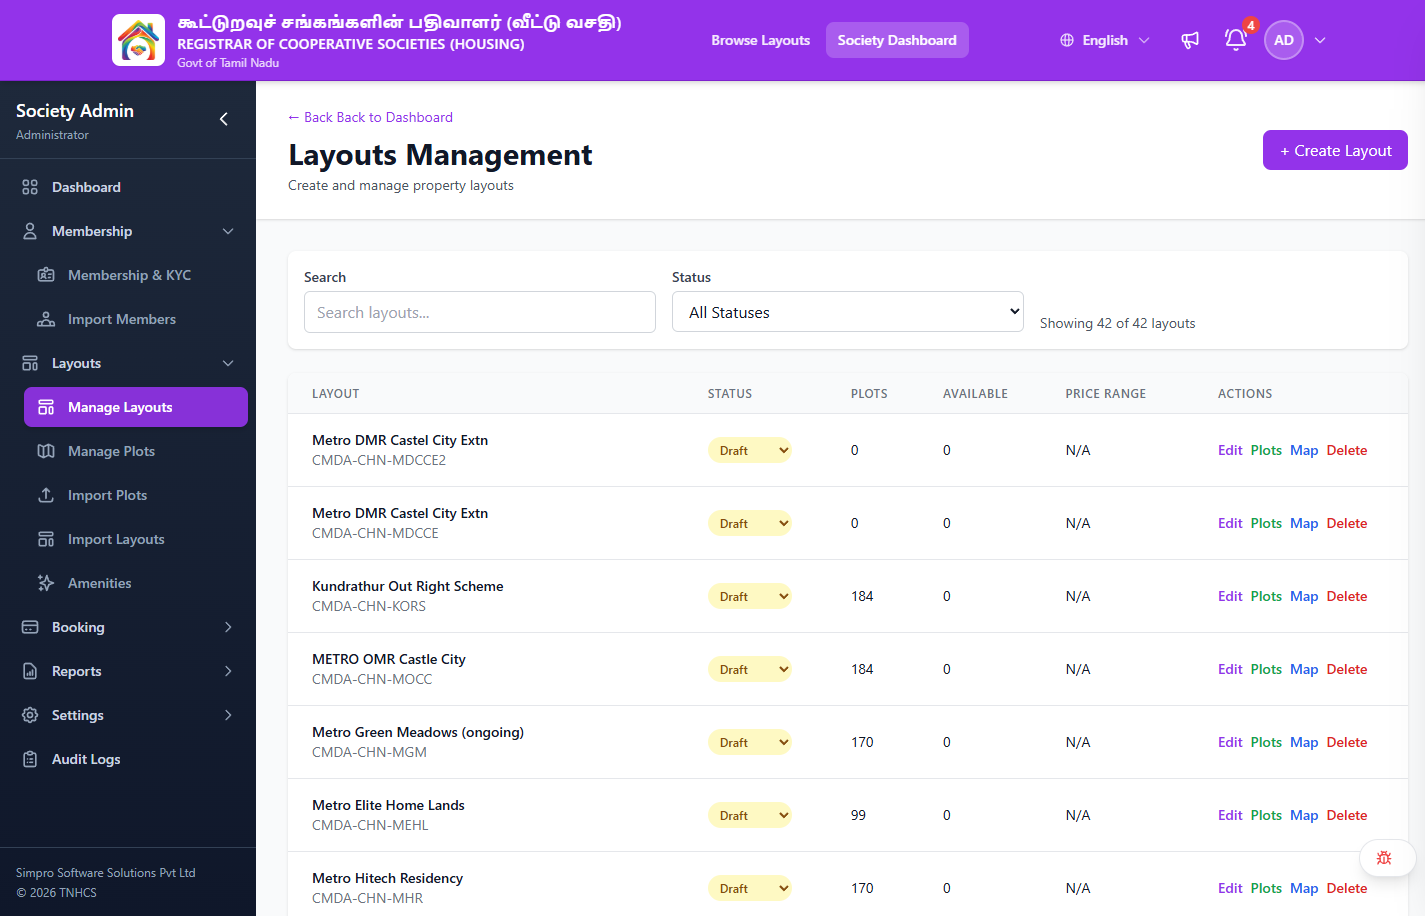
Layout List View
When you navigate to Layouts → Manage Layouts, you see the main list of all layouts in your society.
Header Actions
- ← Back to Dashboard — returns to the admin dashboard
- + Create Layout — opens the layout creation form
Search & Filters
| Control | Description |
|---|---|
| Search | Text search across layout names and codes |
| Status | Dropdown filter: All Statuses, Draft, Active, Inactive, Archived |
The page shows a count: "Showing X of Y layouts".
Layout Table Columns
| Column | Description |
|---|---|
| Layout | Layout name and unique layout code (e.g., CMDA-CHN-MDCCE2) |
| Status | Inline dropdown to change status (Draft / Active / Inactive / Archived) |
| Plots | Total number of plots in this layout |
| Available | Number of plots currently available for booking |
| Price Range | Min–Max price range across plots, or "N/A" if no plots configured |
| Actions | Edit, Plots (link to plot list), Map (link to plot mapper), Delete |
Layout Lifecycle
┌─────────┐          ┌──────────┐          ┌──────────┐          ┌──────────┐
│  DRAFT  │─────────▶│  ACTIVE  │─────────▶│ INACTIVE │─────────▶│ ARCHIVED │
│         │ Publish   │          │Deactivate│          │ Archive   │          │
│ • Edit  │          │ • Public │          │ • No new │          │ • Read   │
│   freely│          │   visible│          │   bookings│         │   only   │
│ • Not   │          │ • Accept │          │ • Existing│          │ • Final  │
│   visible│          │   bookings│         │   bookings│         │   state  │
│   to     │          │ • Record │          │   continue│         │          │
│   public │          │   payments│         │          │          │          │
└─────────┘          └──────────┘          └──────────┘          └──────────┘
| Status | Public Visibility | New Bookings | Existing Bookings | Editable |
|---|---|---|---|---|
| DRAFT | ❌ Hidden | ❌ No | N/A | ✅ Fully |
| ACTIVE | ✅ Visible | ✅ Yes | ✅ Active | ✅ Limited |
| INACTIVE | ✅ Visible (as "Inactive") | ❌ No | ✅ Continue | ⚠️ Minimal |
| ARCHIVED | ❌ Hidden | ❌ No | ❌ No | ❌ None |
Creating a Layout
- Navigate to Layouts → Manage Layouts
- Click Create New Layout
- Fill in the required fields:
Required Fields
| Field | Description | Example |
|---|---|---|
| Layout Name | Descriptive name for the layout | "Sunrise Garden Phase 2" |
| Society | Auto-filled with your assigned society | "Chennai Housing Co-op Society" |
| District | Tamil Nadu district where the layout is located | "Chennai" |
| City / Town | City or town name | "Tambaram" |
| Address | Full address of the layout | "Survey No. 45, Tambaram East" |
| Total Area | Total land area in sq.ft. or acres | "50,000 sq.ft." |
| Total Plots | Expected number of individual plots | "120" |
| Description | Detailed description for public display | Marketing description |
Optional Fields
| Field | Description |
|---|---|
| RERA Number | Real Estate Regulatory Authority registration number |
| Latitude / Longitude | GPS coordinates for map display |
| Base Price per Sq.Ft. | Starting price (individual plots can override) |
| Facing Premiums | Additional charge for East/North-facing plots |
- Click Save as Draft — the layout is created in DRAFT status
Editing Layout Details
- From the layout list, click Edit on any layout
- Modify the fields as needed
- Click Save Changes
Editing an ACTIVE layout that has existing bookings requires caution. Price changes do not retroactively affect confirmed bookings — they only apply to new bookings.
Uploading Map Images
Layout map images help citizens visualize the plot arrangement.
- Open the layout detail page
- Navigate to the Map Image section
- Click Upload Map Image
- Select an image file:
- Formats: JPEG, PNG
- Recommended size: 2000×1500 pixels or higher for clarity
- Max file size: 10MB
- The image is uploaded to Azure Blob Storage and displayed on the layout page
The map image appears:
- On the public layout detail page (for citizens browsing layouts)
- On the plot mapper tool (if plot polygons are configured)
- On booking confirmation screens
Managing Layout Documents
Attach supporting documents to the layout for public transparency:
- Open the layout detail page
- Navigate to the Documents section
- Click Upload Document
- Select the document type:
- Layout Approval Order
- RERA Certificate
- Society Registration
- Site Plan / Engineering Drawing
- Other Supporting Documents
- Upload the file (PDF, up to 10MB)
Citizens can view and download these documents from the layout's public page.
Configuring Amenities
Amenities listed for a layout appear on the public browse page and help citizens choose between layouts.
-
Open the layout detail / edit page
-
Navigate to the Amenities section
-
Select amenities from two groups:
🌍 Global Amenities (managed by Super Admin — read-only for you):
- Water Supply, Electricity, Road Access, Drainage, Street Lights, etc.
🏢 Society Amenities (managed by you for your society):
- Any custom amenities specific to your society
-
Check/uncheck amenities to assign them to this layout
-
Save changes
To create new society-level amenities, see Settings & Configuration.
Partner Banks
Configure financing partner banks that citizens can approach for home loans:
- Open the layout detail / edit page
- Navigate to the Partner Banks section
- Click Add Partner Bank
- Enter bank details:
- Bank Name, Branch, Address
- Contact Person, Phone, Email
- Interest Rate, Max Loan %, Processing Fee
- Save — the bank appears on the public layout page under "Financing Options"
- You can mark one bank as Primary (highlighted to citizens)
See Settings & Configuration for managing partner banks.
Marketing Team (Internal)
Record the marketing team details for internal operations:
- Open the layout detail / edit page
- Navigate to the Marketing Team section
- Configure:
- Team Name
- Commission Percentage
- Agreement Period (start/end dates)
- Status (Active / Inactive)
- Team Members (name, role, phone, email, mark primary contact)
- Save — this information is admin-only and not visible to citizens
Publishing a Layout (DRAFT → ACTIVE)
When your layout is fully configured with plots, amenities, fees, and documents:
- Open the layout detail page
- Click Publish Layout (or Set Active)
- A confirmation dialog summarizes what will happen:
- Layout becomes visible on the public browse page
- Citizens can start booking plots
- Confirm to publish
Before publishing, ensure:
- ✅ All plots are created with correct dimensions and pricing
- ✅ Map image is uploaded
- ✅ Amenities are assigned
- ✅ Fee configuration is set for this layout
- ✅ Payment schedule milestones are defined
- ✅ Terms & conditions are configured
- ✅ At least one partner bank is added (if applicable)
Deactivating a Layout (ACTIVE → INACTIVE)
When all plots are sold or the society decides to stop new bookings:
- Open the layout detail page
- Click Deactivate Layout
- Confirm the action
After deactivating:
- No new bookings are accepted
- Existing bookings continue (payments, milestones, completions)
- Layout is still visible publicly but shown as "Inactive"
Archiving a Layout (INACTIVE → ARCHIVED)
When a layout's operations are fully complete and no further action is needed:
- Open the layout detail page
- Click Archive Layout
- Confirm the action
After archiving:
- Layout is hidden from public view
- All data is preserved in read-only mode
- No further edits or operations are possible
Excel Import
For bulk setup, import layouts from an Excel file:
- Navigate to Layouts → Import Layouts
- Download the Excel (.xlsx) template
- Fill in layout details (one row per layout)
- Upload and review validation results
- Confirm the import
See Bulk Import Operations for detailed file format.
Common Scenarios
"I published a layout but want to edit the description"
You can still edit non-critical fields (description, amenities, documents) on an active layout. Price changes only affect new bookings.
"Citizens can't find my layout in browse"
Check that:
- Layout status is ACTIVE (not still in DRAFT)
- Layout has a district and city set (search/filter depends on these)
- At least one plot is in AVAILABLE status
"I need to change the total number of plots"
The total plots field is indicative. The actual plot count is determined by how many individual plots you create in Plot Management.
Related Pages
- Plot Management — Create and manage individual plots within a layout
- Fee Configuration — Set pricing and fees per layout
- Payment Schedules — Define milestone payment timelines
- Settings & Configuration — Manage amenities and partner banks